Showing posts with label Spellbinders. Show all posts

Monday, March 11, 2019

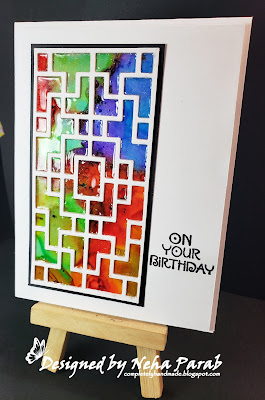
CAS Mixup March Challenge - On Your Birthday

  
Hello Everyone!!!
After a long break I am back with a card today for all of you. I have been trying a few background techniques but wasn't getting much inspired to convert them into cards. But the CAS Mixup challenge for March helped me through it. Their technique for this month is "Faux Stained Glass"


Lets have a look at the card. 


I have used various Tim Holtz Alcohol ink sets (Beach Deco & Spring Break ) to create the focal panel for the card. Then using Spellbinders - Chinese Traditional Fence die, I die-cut multiple layers of white card-stock to create the stain-glass window. I adhered the alcohol ink background to the multiple layers of white die-cut pieces, this creates dimension for the faux stained glass effect. Finally I filled Ranger's Glossy Accent's  in the spaces between the die-cuts through which the alcohol inked background is visible. Attached the whole panel on a slightly larger black card- stock panel. Finished the card by attached the entire panel to the left-center of the card & stamping the sentiment. 

I am submitting this card to :


I hope you all liked it. I would love to hear back from you all. Thank you very much for taking your time to notice it. Hope to hear again from all of  u soon. Till then take care. :)

PS: If my posts inspire you to create something on similar lines, I feel highly flattered. But please, do respect the effort I take in conceptualizing and executing, please give a direct link to my work when you are inspired by mine. Thanks for understanding :-)


Saturday, February 3, 2018

Some Odd Girl - Pressie Tia

Hello Everyone!
I am back with another card inspiration using a very cute image from Some Odd Girl.
Lets have a look at the card first.


These are the steps I took to create this card:


  1. I printed the "Pressie Tia" image on Strathmore Bristol smooth card stock.
  2. Colored the image using Chameleon markers (colors mentioned in supplies below) and fussy cut the image .
  3. Mounted the image on a die cut from Spellbinders beaded oval dies.
  4. Finally created a fancy card panel using pattern papers from MFT, DCWV & SSS.
  5. Attached the card panel to the A2 sized card base and finished the card.
I am submitting this card to :

  1. Simon Says Stamp - Wednesday Challenge : Anything Goes
  2. Seize the Birthday

I hope you all liked it. I would love to hear back from you all. Thank you very much for taking your time to notice it. Hope to hear again from all of  u soon. Till then take care. :)

PS: If my posts inspire you to create something on similar lines, I feel highly flattered. But please, do respect the effort I take in conceptualizing and executing, please give a direct link to my work when you are inspired by mine. Thanks for understanding :-)  

Supplies Used:  
Recollections card stock - White : Link
Strathmore Bristol paper  : SSS
Chameleon pens - (Eyes: YG3, GR1, Face: NU2, NU3, Hair: BR4, NU4, Dress: VO4, CG8, Gift & shoes: PK3, PK4, CG8) Link, Link
Distress ink mini - Wilted Violet : SSS
MFT 6 x6 Plaid Pattern Paper pack :Link
DCWV Patterned Paper - Maps, text & Ledgers : Link
Distress mini ink blending tool : SSS
Distress mini ink blending sponges : SSS 
Spellbinders - Beaded oval dies : Link
Cuttlebug die cutting machine + Cutting plates : SSS
Simon Says Clear Stamp - Sketch Ranunculus : SSS
Versafine inkpad - Onyx Black : SSS
Tombow Mono glue : SSS   
Foam Tape : Scotch SSS

Lawn Fawn Stamp Shammy : SSS

Wednesday, November 8, 2017

Thank You Card - Day 3


Hello Everyone!!!
Welcome back to my blog.Today I am back with another "Thank you" themed card for you. If you have just dropped in here, you can view few of my past thank you cards here

Today's card is inspired by this week's Fusion Card Challenge
Shall we have a look at the card now???


I am submitting this card to :
I hope you all liked it. I would love to hear back from you all. Thank you very much for taking your time to notice it. Hope to hear again from all of  u soon. Till then take care. :)

PS: If my posts inspire you to create something on similar lines, I feel highly flattered. But please, do respect the effort I take in conceptualizing and executing, please give a direct link to my work when you are inspired by mine. Thanks for understanding :-)  

Supplies Used:  
Recollections A2 cardstock - Brown, Beige, Green, Red, Yellow : Link
Distress ink mini - Rusty Hinge :SSS
Distress mini ink blending tool : SSS
Distress mini ink blending sponges : SSS 
Simon Says Stamp - Ornate stamp : SSS
Papertrey Ink - Keep it Simple Thank you stamp set : Link
Versamark watermark inkpad: SSS
Cuttlebug Die-cutting machine : SSS
Spellbinders Die D-Lites - Leaves : SSS
ArtC - Tag die : Link
Stamping Block : SSS
Fiskars Paper trimmer : SSS
Lawn Fawn Stamp Shammy : SSS
Tombow Mono glue  : SSS
Foam Tape : Scotch SSS

Saturday, October 28, 2017

Technique of the Month - Repetitive Stamping

Hello Everyone!!!
Welcome to my blog! 
I am back with "Technique of the Month" for August 2017. This month's technique is "Repetitive Stamping". 

The techniques is really very simple and the supplies needed are also very less. 

So before we dive into the technique, let's have a look at today's card first, shall we...???


Technique: The technique is really very simple. I have created a short video to explain the process.


I am submitting this card to:


I hope you all liked it. I would love to hear back from you all. Thank you very much for taking your time to notice it. Hope to hear again from all of  u soon. Till then take care. :)


PS: If my posts inspire you to create something on similar lines, I feel highly flattered. But please, do respect the effort I take in conceptualizing and executing, please give a direct link to my work when you are inspired by mine. Thanks for understanding :-)  

Supplies Used:  
Recollections A2 card base - White : Link
Strathmore Bristol paper  : SSS 
My Mind's eye Patterned paper - The Sweetest Thing - Tangerine 
Crate Paper Patterned paper - The Framer's Mark : 
Memento Dye  inkdrops - Dandelion : SSS
Memento Dye  inkdrops - Grape Jelly : SSS
SSS Hybrid ink - Orange Slush, Key Lime : SSS
Versafine inkpad - Onyx Black : SSS
Misti original stamping tool : SSS
Spellbinders Embossing Folder - Grid  : SSS
Cuttlebug diecutting tool : SSS
Fiskars Paper trimmer : SSS
Lawn Fawn Stamp Shammy : SSS
Tombow Mono glue  : SSS
Foam Tape - Scotch / SSS
Recollections vellum 

Thursday, October 5, 2017

Diwali Cards - Mudra Stamps Guest Designing

Hello Everyone!!!

I’m so excited to finally be able to share with you all today, that I am the Guest Designer  for Mudra Craft Stamps today and I'm so happy about it! I was thrilled when Varshitha, the wonderful owner of Mudra gave me this opportunity. 

Mudra Craft Stamps is an Indian Company and they manufacture beautiful stamps, stencils, sequins etc I had a lot of fun playing with the supplies. 

I've shared 5 cards on the Mudra blog today. I hope you like what I have to share. 
You can check out the blog post with all the details here

Here are a few sneak peeks of my cards.


I hope you all like my cards. I would love to hear back from you all. Thank you very much for taking your time to notice it. Hope to hear again from all of  u soon. Till then take care. :)

PS: If my posts inspire you to create something on similar lines, I feel highly flattered. But please, do respect the effort I take in conceptualizing and executing, please give a direct link to my work when you are inspired by mine. Thanks for understanding :-) 


Monday, August 28, 2017

Newton Loves Cake

Hello Everyone!!!
Today I am back again with my last installment of card inspiration as Guest Designer at  Newton’s Nook Designs for the month of August!!!

I really struggle a lot with critter cards as they need to be cute or tell some story through them. I wanted this card to be as special as the other three. So for this week's card I have used the Newton Loves Cake from the latest Newton's Nook Designs. Lets' take a look at the card now.


Here is a close up of the unicorn showing the coloring


Process:
  1. I started off by stamping the the image from the  Newton Loves Cake stamp set on Strathmore Bristol cardstock.
  2. Then I colored the images using Zig clean color real brush pens (colors mentioned is description) & fuzzy cut them using scissors.
  3. Using Spellbinders Oval die, I die-cut an oval from a post-it not to create a mask.
  4. On a separate Strathmore Bristol card panel that's smaller than A2 size, I attached the negative of the die-cut oval post-it. 
  5. Using Distress ink mini cubes I did some ink blending inside the oval area that was open through the mask. Then heavily sprayed it with water and added some salt on the wet surface and let it dry.
  6. Once the surface was dry, I scratched off the salt from the card panel .
  7. I added some doodled pattern around this oval using Sharpie black pen.
  8. Later I added a few splatters of Finetec gold watercolor on the card panel to add interest.
  9. Next I stamped the sentiment on a vellum strip using Versamark inkpad and heat embossed the sentiment in Hero Arts black embossing powder.
  10. Then I attached the vellum strip to the card panel using glue on the ends and tuck the vellum strip around the card panel.
  11. Finally I attached the colored image slightly over the vellum strip using foam tape, 
  12. I finished the card by attaching the entire panel on an A2 sized top folding black card base and added a few sequins to the card  as finishing touches.
I had so much fun creating all these cards and I am really very grateful to all those who gave me this chance, stuck by my side  & appreciated my work. 

I hope you all liked it. I would love to hear back from you all. Thank you very much for taking your time to notice it. Hope to hear again from all of  u soon. Till then take care. :)

PS: If my posts inspire you to create something on similar lines, I feel highly flattered. But please, do respect the effort I take in conceptualizing and executing, please give a direct link to my work when you are inspired by mine. Thanks for understanding :-)    

Supplies used:
Recollection A2 card base - black 
Strathmore Bristol paper  : SSS 
Newton's Nook Designs stamp set - Newton Loves Cake : NND | SSS
Zig Clean Color Real Brush pens - 095, 096, 099, 900, 901, 036, 025, 222, 050, 052, 803 : SSS
Distress ink mini - Salty Ocean : SSS
Distress ink mini - Picked Raspberry: SSS
Misti Stamping tool original : SSS
Fiskars paper trimmer : SSS
Distress mini ink blending tool : SSS
Distress mini ink blending sponges : SSS 
Distress Sprayer  : SSS
Sharpie 0.5 Black pen : SSS
Spellbinders Classic  Oval die : SSS
Finetec Mica watercolors : SSS
Bazzill 40LB Vellum : SSS
Versamark watermark inkpad: SSS
Antistatic powder tool : SSS

Hero Arts Black Embossing powder : SSS
Simon Says Stamps - Frozen Fractals sequins : SSS
Pretty Pink Posh Friendship mix sequins : SSS
Tombow Mono glue : SSS   
Foam Tape : Scotch | SSS
Lawn Fawn Stamp Shammy : SSS
Salt


Sunday, August 20, 2017

Technique of the Month : Embossing Folder Stamping

Hello Everyone!!!
Welcome to my blog!
I am back with "Technique of the Month" for August 2017. This month's technique is "Embossing Folder Stamping".

This a really easy technique. I like to use it to create unique and versatile background designs/


So before we dive into the technique, let's have a look at today's card first, shall we...???


Technique: The technique is really very simple. I have created a short video to explain the process.


I am submitting this card to:


I hope you all liked it. I would love to hear back from you all. Thank you very much for taking your time to notice it. Hope to hear again from all of  u soon. Till then take care. :)


PS: If my posts inspire you to create something on similar lines, I feel highly flattered. But please, do respect the effort I take in conceptualizing and executing, please give a direct link to my work when you are inspired by mine. Thanks for understanding :-)  


Supplies Used:  
Recollections A2 card base - White
Recollections card-stock
Spellbinders Embossing Folder  - Ripples : SSS
Spellbinders Embossing Folder  - Overlapping Circles : SSS
Cuttlebug embossing Folder - D'Vine Swirls
Cuttlebug embossing Folder - Stylized Flowers
Distress Ink Mini - Twisted Citron : SSS
Distress Ink Mini -  Wild Honey : SSS
Distress Ink Mini -  Ripe Persimmon : SSS
Distress Ink Mini -  Crushed Olive : SSS
Papertrey Ink mini inkpad - Tropical teal  : PTI
Memento Dye  inkdrops   : SSS
Distress Sprayer  : SSS
Misti Stamping tool original : SSS
Fiskars paper trimmer : SSS
Cuttlebug diecutting tool :  : SSS
Versafine inkpad - Onyx Black:  : SSS
Newton's Nook Designs stamp set - Toucan Party : SSS | NND
Darice heart die  
Zig Clean Color Real Brush pens - 900, 090, 060, 004, 020, 046, 050, 023 : SSS
Distress mini ink blending tool : SSS
Distress mini ink blending sponges : SSS 
Tombow Mono glue : SSS   
Foam Tape : Scotch SSS
Lawn Fawn Stamp Shammy : SSS
Ranger Glossy Accents : SSS


Sunday, August 6, 2017

Happy Rakhi

Hello Everyone!!!

Today's post is a special one.  According to Hindu calendar tomorrow we celebrate "Rakshabandhan" all over India. Back in the olden days, Rajput queens sent "Rakhi" threads to rulers of neighboring states as a token of brotherhood. The rulers in turn vowed to protect them for life.  Today the festival symbolizes the same love and affection between brothers and sisters. While the sisters pray for the lifelong well being of their brothers, the brothers promise to care for them for as long as they live. People in India celebrate Rakhi with a lot of fun and enthusiasm.

For this auspicious occasion, I have created a few beautiful and easy card as well handmade Rakhi ideas using art supplies in my stash. I hope you like it. Lets have a look at them. 


For the card I did not feel like inventing the wheel all over as the Rakhi was more important to me. So I just followed this card idea all over again as is to created the card.  For the Rakhi I braided a few strands of red, green, yellow cross stitch threads along with few strands of  DMC Gold threads. Using some layered floral dies, I created the flowers, attahed leaves to them and finally adhered them to the braid. 

I am submitting this card to:
I hope you all liked the card as well as Rakhi idea. I would love to hear back from you all. Thank you very much for taking your time to notice it. Hope to hear again from all of  u soon. 
Till then take care. :)


PS: If my posts inspire you to create something on similar lines, I feel highly flattered. But please, do respect the effort I take in conceptualizing and executing, please give a direct link to my work when you are inspired by mine. Thanks for understanding :-)    

Supplies used:
Recollection card base - Maroon
Recollection card stock - Beige
Verve Stamps  stamp set- Peaceful Medallions  (discontinued stamp set)
Altenew stamp set - Hennah Elements : Altenew | SSS
Lil' Inker Designs stamp set - Modern mehndi : Link
Peek a Boo Designs stamp set - All Occasions Hindi : Link
Simon Says Stamp Dye ink - Schoolhouse red  : SSS
Spellbinders die set - Rose Creations : SSS
Misti Stamping tool original : SSS
Fiskars paper trimmer : SSS
Tombow Mono glue : SSS   
Lawn Fawn Stamp Shammy : SSS
Rhinestones
DMC Metallic thread - Gold : SSS


Wednesday, July 26, 2017

Shop Your Scraps - Striped Backgrounds

Hello Everyone!!!

Last week while organizing my card-stock and patterned papers, I realized that over the past few years I have accumulated a lot of paper scraps. I have always thought about throwing them away, but I can't come to do that. So I have decided to make cards just using those scraps.

While I was at it, I felt that it would be a good idea to share the process of creating those card ideas with you, thus I will be showcasing a new card idea using just scraps on my blog every month. How is that???

So let see this month's cards.


Technique: The technique is really very simple. I have created a short video to explain the process. I hope that helps.


I am submitting these cards to :

I hope you all liked it. I would love to hear back from you all. Thank you very much for taking your time to notice it. Hope to hear again from all of  u soon. Till then take care. :)

PS: If my posts inspire you to create something on similar lines, I feel highly flattered. But please, do respect the effort I take in conceptualizing and executing, please give a direct link to my work when you are inspired by mine. Thanks for understanding :-) 


Supplies Used:  
Recollections A2 card base - White
Recollections card-stock
Spellbinders Shapeabailities  Dies - Flutters
Spellbinders Shapeabailities  Dies - Les Papillons : https://goo.gl/8NRYLH
Recollections Die- Butterfly
Lil' Inker Designs stamp set - Mehndi : https://goo.gl/hj8sFu
Verve Stamps stamp set - Floral Notes
Stampendous stamp set - Happy Messages : https://goo.gl/4pkFHU
Tsuekineko Memento Dye  inkdrops  - Lilac Posies : https://goo.gl/qZ87mb
Tsuekineko Memento Dye  inkdrops  - Grape Jelly : https://goo.gl/qZ87mb
Martha Stewart Butterfly Punch
Misti original stamping tool
Cuttlebug dieecutting tool
Mini ink blending tools : https://goo.gl/pLeuaP
Mini ink blending foams : https://goo.gl/uJaHU6
Ranger Stickles - Forsted Lace : https://goo.gl/9rmGEf
Fiskars Paper trimmer : https://goo.gl/sWcUWy
Fiskars Tweezers : https://goo.gl/1gGj61
Lawn Fawn Stamp Shammy : https://goo.gl/mrYa5V
Tombow Mono glue  : https://goo.gl/UKmXDV
Foam Tape - Scotch / SSS :  https://goo.gl/psjn6Q   or   https://goo.gl/9Api5P


Friday, June 16, 2017

For You..

Hello Everyone!!!
As you all know due to personal reasons my crafting mojo was MIA for past couple of months. So I was going through the various challenge blog to get it back and that's when I came across Simon Says Stamp's - Monday Challenge - it said "Touchy Feely". I got right up, went to the craft desk and got working.

So today I am here with a bright and colorful summer themed card for all of you. Lets have a look at the card first.


I always like working with embossing/modeling paste and stencils. This was the absolute correct moment to use them. So here is a small description how I created this card:
I really loved how all the colors mixed on the card panel so I am submitting this card to :
I hope you all liked it. I would love to hear back from you all. Thank you very much for taking your time to notice it. Hope to hear again from all of  u soon. Till then take care. :)

PS: If my posts inspire you to create something on similar lines, I feel highly flattered. But please, do respect the effort I take in conceptualizing and executing, please give a direct link to my work when you are inspired by mine. Thanks for understanding :-) 


Supplies Used:
Recollections A2 card base - white
Strathmore - Bristol Smooth paper
Ranger Ink Texture paste - white
Hero arts stencil - tilework
Dr. Ph. Martin's Hydrus watercolors
Concord & 9th die- Blossom
Spellbinders die-  Phrase Set Two
Recolletions sequins
Ranger Ink - Palette Knife
Tombow Mono glue
Foam Tape - Scotch / SSS


Drive more traffic to your online store using performance based marketing.